Outlook Autodiscover Using Nginx Server Block
It provides the steps to add and configure the Nginx Server Block for Microsoft Outlook autodiscover.
Outlook can automatically detect email server configurations while adding email accounts. This tutorial provides the steps to configure the Nginx Server Block for the Outlook lookup using the autodiscover.example.com subdomain where example.com is your domain.
You may also refer to Outlook Autodiscover Using Apache Virtual Host.
Prerequisites
This tutorial assumes that the Nginx Web Server, PHP, and Email Server are already installed on the system. You can follow How To Install And Configure Nginx on Ubuntu 20.04 LTS, Configure Virtual Host Or Server Block On Nginx, How To Install Let's Encrypt For Nginx On Ubuntu, How To Install PHP For Nginx On Ubuntu 20.04 LTS, and Install Mail Server On Ubuntu 20.04 LTS Using Postfix, Dovecot, and Roundcube.
It also expects that a CNAME record pointing to your Nginx Web Server already exists for autodiscover.example.com. An SRV record is also required for _autodiscover._tcp.example.com pointing to autodiscover.example.com.
--------------------------------------------------------------------------------------
Name				Type	Value				TTL
--------------------------------------------------------------------------------------
autodiscover.example.com.	CNAME	mail.example.com		300
_autodiscover._tcp.example.com.	CNAME	autodiscover.example.com	300
--------------------------------------------------------------------------------------
Add Server Blocks
This section provides the steps to add Server Blocks or Virtual Host with basic configuration as shown below.
# Server Block
sudo nano /etc/nginx/sites-available/autodiscover.example.com

# Content
# Content
server {
        server_name autodiscover.example.com;

        root /var/www/example.com/autodiscover;

        index.php index.html;

        location / {
                try_files $uri $uri/ =404;
        }

        location = /autodiscover/autodiscover.xml
        {
            rewrite .* /autodiscover/autodiscover.php redirect;
        }

        location ~ \.php$ {
                include snippets/fastcgi-php.conf;
                fastcgi_pass unix:/var/run/php/php7.4-fpm.sock;
        }

        location ~ /\.ht {
                deny all;
        }

	listen 443 ssl; # managed by Certbot
	ssl_certificate /etc/letsencrypt/live/example.com/fullchain.pem; # managed by Certbot
	ssl_certificate_key /etc/letsencrypt/live/example.com/privkey.pem; # managed by Certbot
	include /etc/letsencrypt/options-ssl-nginx.conf; # managed by Certbot
	ssl_dhparam /etc/letsencrypt/ssl-dhparams.pem; # managed by Certbot
}

server {
    if ($host = autodiscover.example.com) {
        return 301 https://$host$request_uri;
    } # managed by Certbot

    listen       80;
    server_name  autodiscover.example.com;
    return 404; # managed by Certbot
}

# Save and exit the editor - Press Ctrl + o -> Press Enter -> Ctrl + x
Add Autodiscover Settings
Now we will create the virtual host directory and add the email server settings for Outlook autodiscover. Create the virtual host directory and configure outlook as shown below.
# Create Directories
sudo mkdir /var/www/example.com/autodiscover
sudo mkdir /var/www/example.com/autodiscover/autodiscover

# Add configuration file
sudo nano /var/www/example.com/autodiscover/autodiscover/autodiscover.php

# Content
<?php
//get raw POST data so we can extract the email address
$data = file_get_contents("php://input");
preg_match("/\<EMailAddress\>(.*?)\<\/EMailAddress\>/", $data, $matches);

//set Content-Type
header("Content-Type: application/xml");
echo '<?xml version="1.0" encoding="utf-8" ?>'; ?>

<Autodiscover xmlns="http://schemas.microsoft.com/exchange/autodiscover/responseschema/2006">
   <Response xmlns="http://schemas.microsoft.com/exchange/autodiscover/outlook/responseschema/2006a">
       <Account>
           <AccountType>email</AccountType>
           <Action>settings</Action>
           <Protocol>
               <Type>IMAP</Type>
               <Server>mail.example.com</Server>
               <Port>993</Port>
               <DomainRequired>off</DomainRequired>
               <LoginName><?php echo $matches[1]; ?></LoginName>
               <SPA>off</SPA>
               <SSL>on</SSL>
               <AuthRequired>on</AuthRequired>
           </Protocol>
           <Protocol>
               <Type>POP3</Type>
               <Server>mail.example.com</Server>
               <Port>995</Port>
               <DomainRequired>off</DomainRequired>
               <LoginName><?php echo $matches[1]; ?></LoginName>
               <SPA>off</SPA>
               <SSL>on</SSL>
               <AuthRequired>on</AuthRequired>
           </Protocol>
           <Protocol>
               <Type>SMTP</Type>
               <Server>mail.example.com</Server>
               <Port>587</Port>
               <DomainRequired>off</DomainRequired>
               <LoginName><?php echo $matches[1]; ?></LoginName>
               <SPA>off</SPA>
               <Encryption>TLS</Encryption>
               <AuthRequired>on</AuthRequired>
               <UsePOPAuth>off</UsePOPAuth>
               <SMTPLast>off</SMTPLast>
           </Protocol>
       </Account>
   </Response>
</Autodiscover>

# Save and exit the editor - Press Ctrl + o -> Press Enter -> Ctrl + x
You may further update the above script to use SSL for SMTP as shown below.
   <Protocol>
       <Type>SMTP</Type>
       <Server>mail.example.com</Server>
       <Port>465</Port>
       <DomainRequired>off</DomainRequired>
       <LoginName><?php echo $matches[1]; ?></LoginName>
       <SPA>off</SPA>
       <Encryption>SSL</Encryption>
       <AuthRequired>on</AuthRequired>
       <UsePOPAuth>off</UsePOPAuth>
       <SMTPLast>off</SMTPLast>
   </Protocol>
This completes the email server configuration by specifying the protocols supported by the email server. You may add additional protocols supported by your email server.
Enable Server Block
After adding the required configurations, enable the server block and reload the Nginx Web Server as shown below.
# Enable server block
sudo ln -s /etc/nginx/sites-available/autodiscover.example.com /etc/nginx/sites-enabled/autodiscover.example.com

# Reload Nginx
sudo systemctl reload nginx
# OR
sudo service nginx reload
This enables the server block to be queried by Microsoft Outlook while adding an email account.
Add Email Account
This section provides the steps to add an email account to Outlook for the first time and subsequent email accounts. I have used Microsoft Outlook 2007 for demonstration purposes. The steps should be similar for other versions of Outlook. Outlook asks for the account details on the first launch as shown in Fig 1.
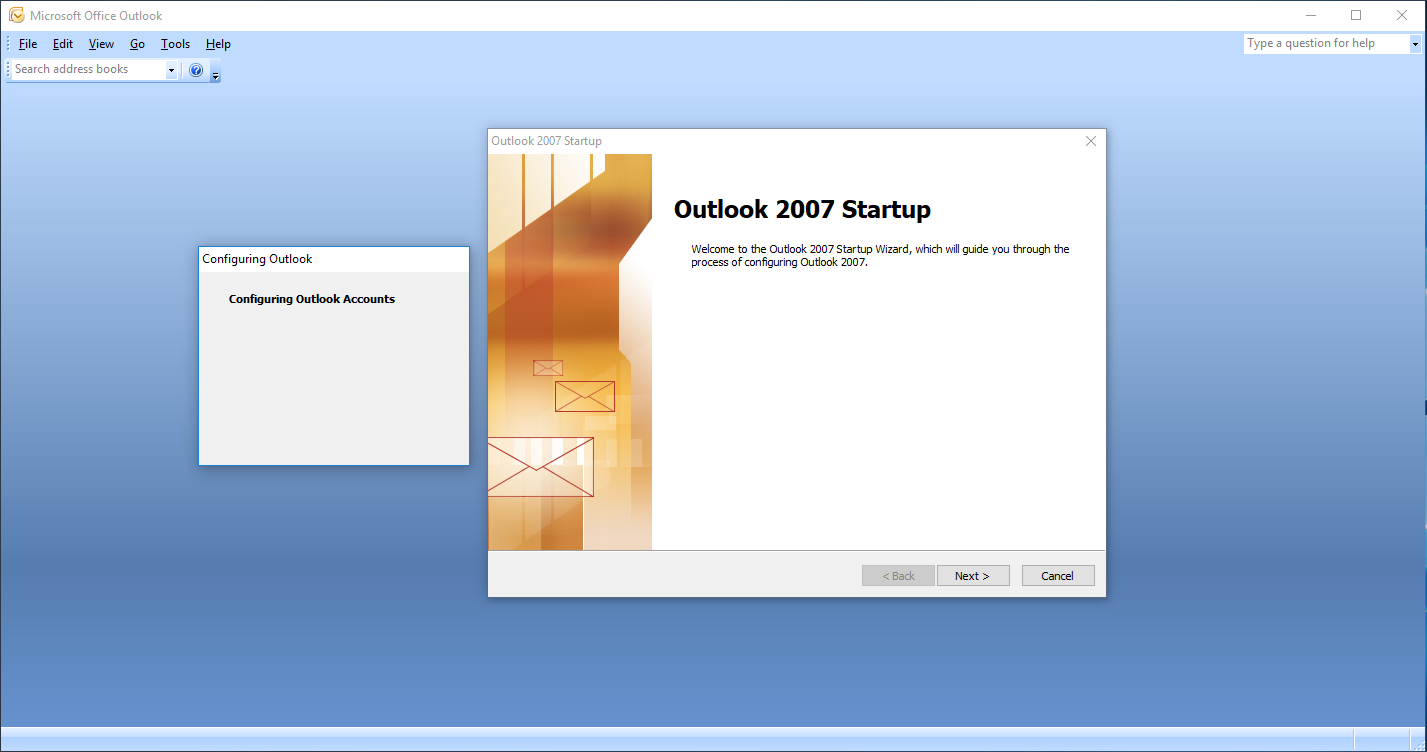
Fig 1
Click the Next Button to continue with the setup. It will ask to configure an email account as shown in Fig 2.
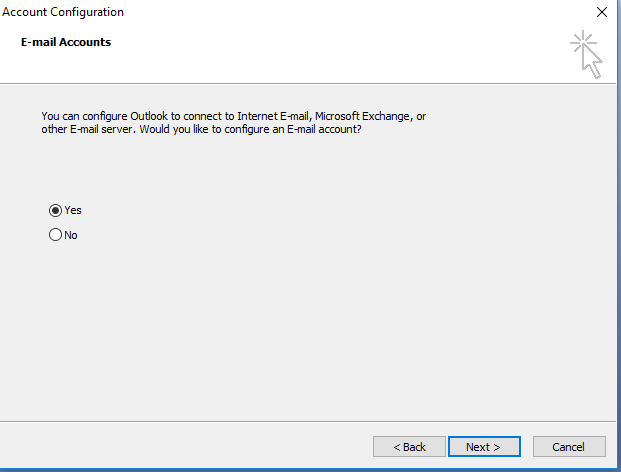
Fig 2
Choose the option Yes and click the Next Button. It asks for the account details as shown in Fig 3.
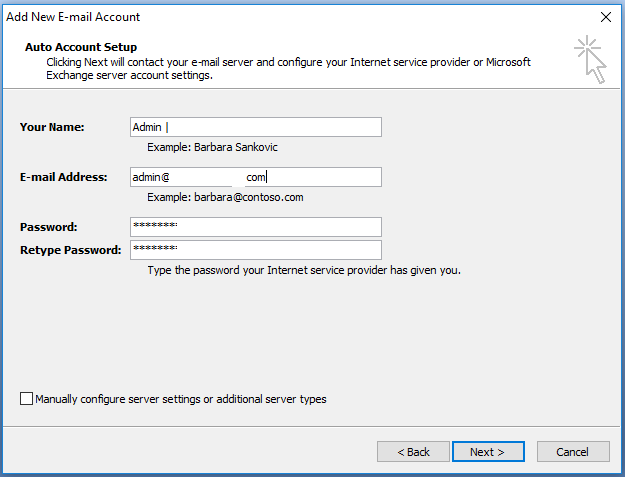
Fig 3
Now provide your name, email address, and password and click the Next Button. It might also show an SSL certificate warning as shown in Fig 4.
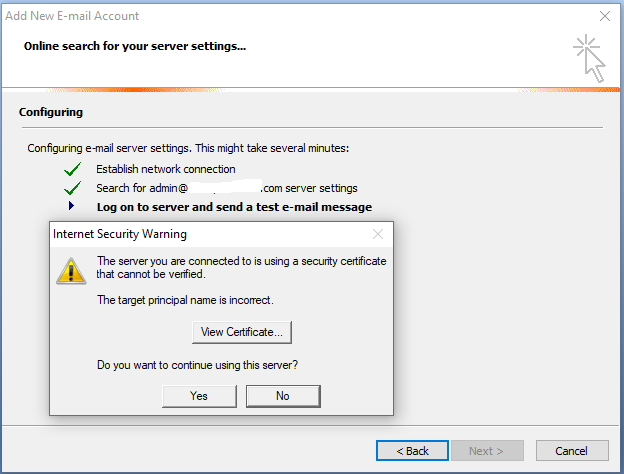
Fig 4
Click the Yes Button to accept the SSL certificate. It probes the email server and queries the domain autodiscover.example.com. On finding the server settings and login success, it shows the email server communication details as shown in Fig 5.
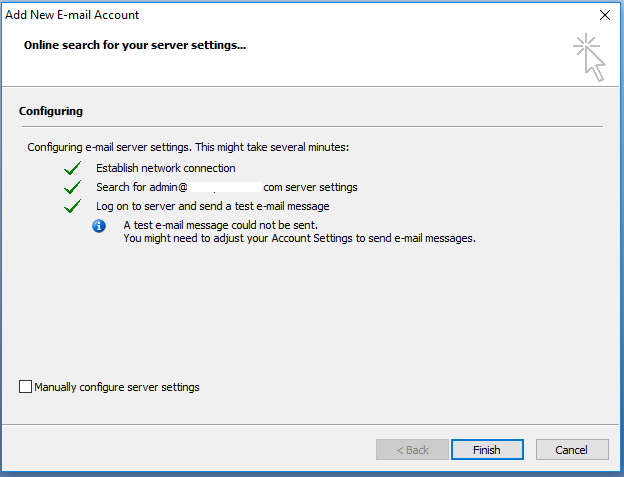
Fig 5
It shows the warning due to failure in sending the test email. I have shown the options to change the SMTP details in Fig 9 to resolve this error. Now click the Finish Button to confirm the email account. It will add the email account to the library of the account as shown in Fig 6.
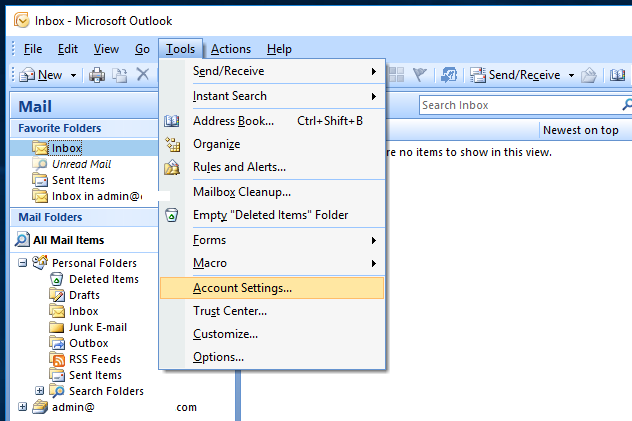
Fig 6
Now click Tools -> Account Settings to open the Account Settings Panel as shown in Fig 7. It shows the list of active accounts as shown in Fig 8.
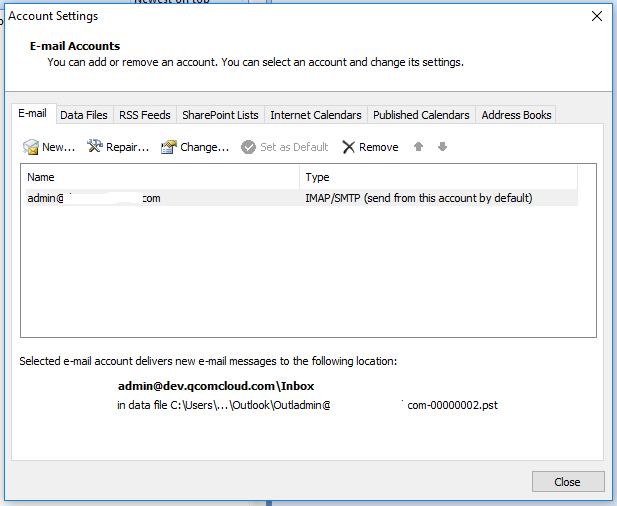
Fig 7
Now keep the account selected and click the option Change. It will show the email account settings as shown in Fig 8.
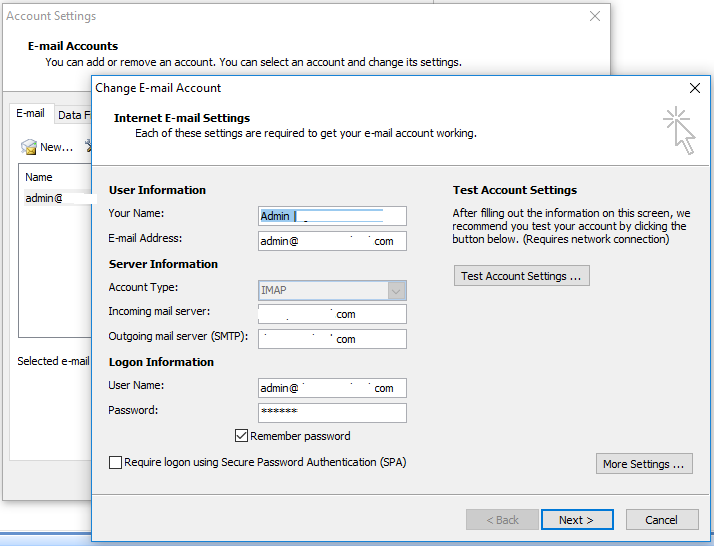
Fig 8
Now click the More Settings Button to confirm the email server ports as shown in Fig 9. You might be required to change the SMTP port to 587 and protocol to TLS according to the instructions provided by your email server admin.
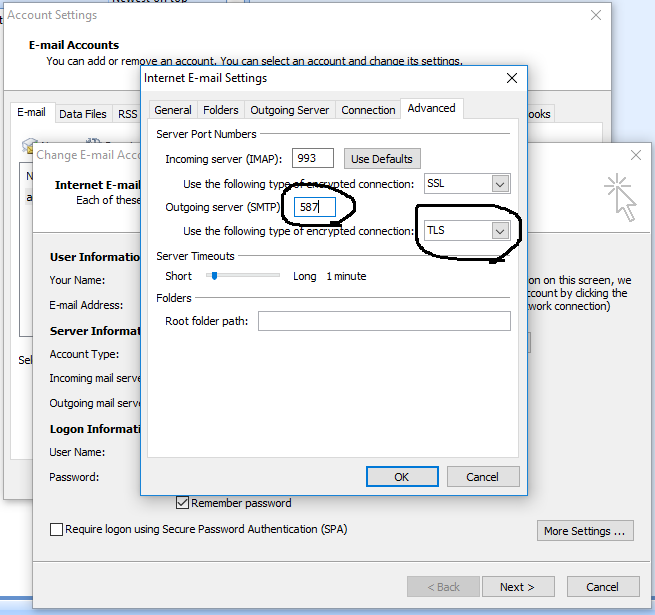
Fig 9
Now click the OK Button to close the Settings wizard. This completes the first email account setup using Microsoft Outlook. Now try to send and receive email using the newly configured account.
Again open the Accounts Settings Panel as shown in Fig 6 and Fig 7 and click the New Option. We can further add the subsequent accounts as shown in Fig 10 to Fig 13.
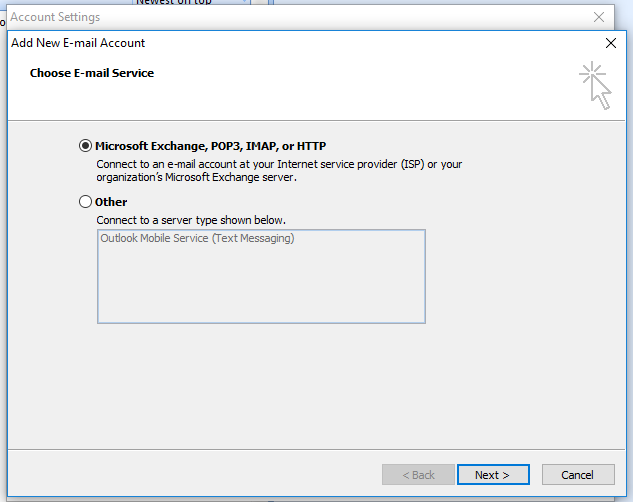
Fig 10
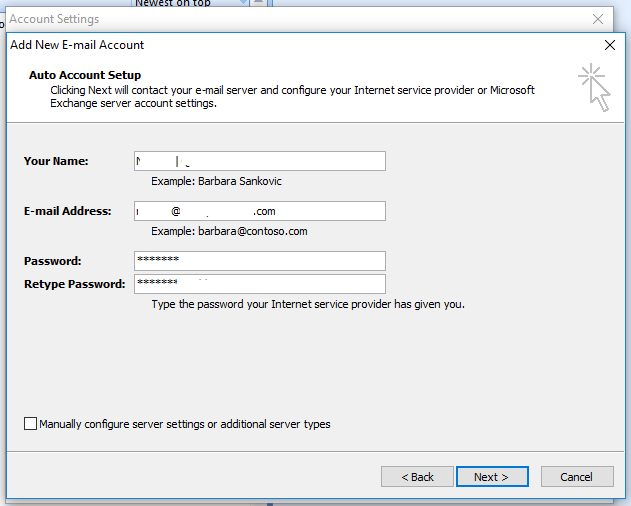
Fig 11
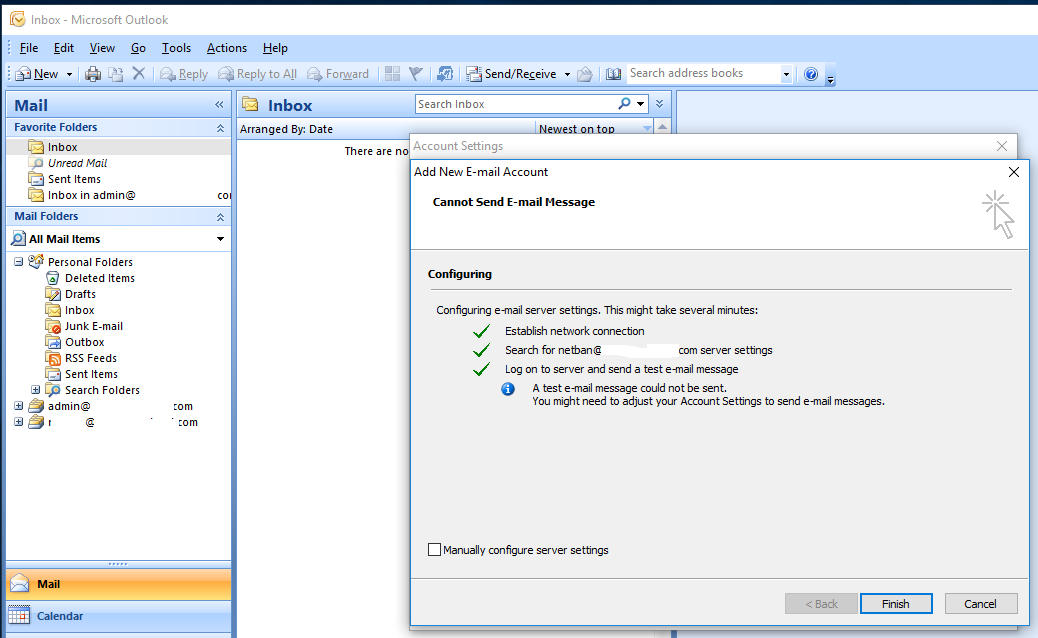
Fig 12
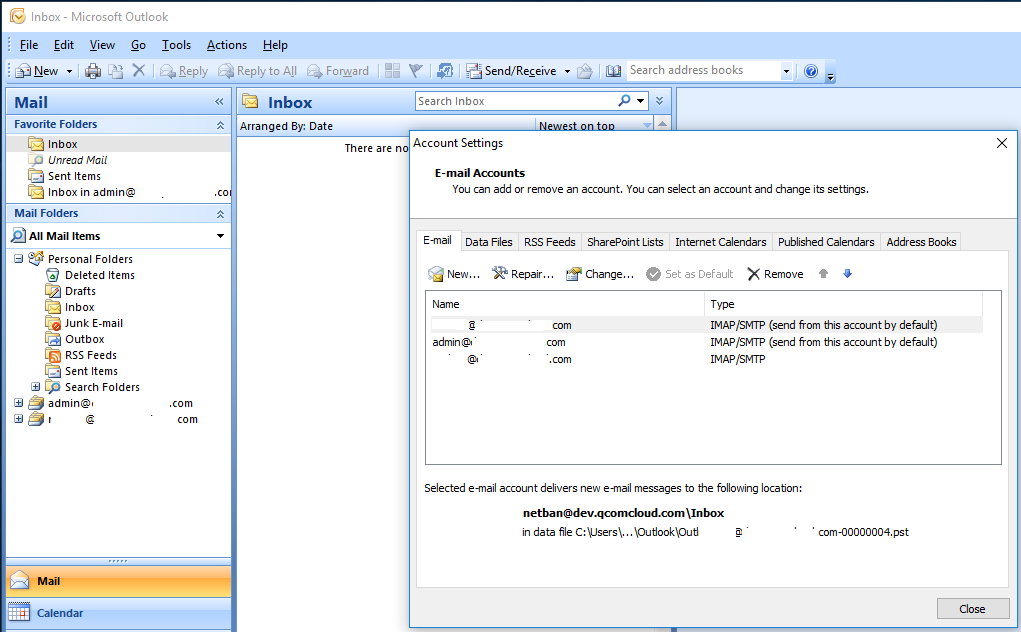
Fig 13
Similar to the first account, change the SMTP port if required. Outlook will pull the emails from the email server by clicking the Inbox as shown in Fig 14.
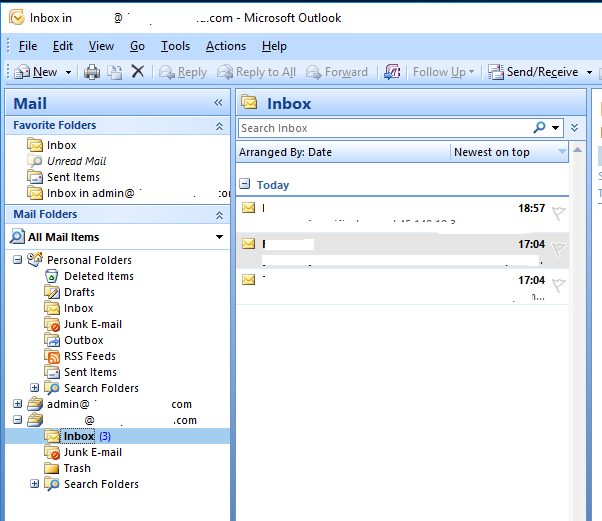
Fig 14
This is how we can add email accounts to Microsoft Outlook by probing the email server having the autodiscover.example.com virtual host.
Summary
This tutorial provided the steps to add the virtual host and configure it for Microsoft Outlook to support the autodiscover feature. It also provided the steps to add accounts to Outlook using the autodiscover feature.


